STANDING. Simple in itself but more to it in a practicing Yoga scenario than you might think. I remember having conversations with fellow Bikram Yogi’s on my training and over the years on the best way to stand in between the standing asanas. It wasn’t formally dealt with on the TTC in 2001. It was just taken as a ‘given’ that it was understood; and YET without guidance it took me a long time to work out the best way and have confidence in doing this simple thing in between the postures that one could be forgiven for believing it was a big secret before! I did a lot of delving and comparing and practicing this myself to refine it whilst at the same time ensuring I was honouring the Bikram method by not doing anything that appeared contrary to what seemed to be going on in every Bikram class I have ever been in. Some of what I describe is so subtle as to not be seen by many a naked eye as a ‘happening’ but yet as a teacher I see 🙂 .
I have never seen it written down in such a way that incorporates all the elements of the way I choose to teach it and so I present it here as food for thought but with a strong recommendation to try out the following in the hopes that it will benefit ye.
As a teacher I personally feel it is so important that I choose to ‘teach’ it in class too even though it is not in the ‘dialogue’; it is too important to leave to chance, I really don’t want our practitioners ‘hanging out’ in the wrong ‘resting’ stance, fatigueing themselves in poor structuring/alignment or forcing aspects of their body to function contrary to its design or current capabilities as they try to ‘recreate’ by moving body landmarks that move easily and not attending to ‘stuck’ body parts.
MAYBE THIS IS THE MOST IMPORTANT POSTURE YOU WILL PRACTICE IN YOUR 90 MINUTES (well it is for the purposes of this post right now 🙂 ). All the postures in Bikram are important, they are a journey back to your best Self, physically and mentally, but this one, STANDING RESTING POSITION (OR TADASANA (MOUNTAIN variation) OR SAMASTHITI (EQUAL STANDING)) is where you can establish a stable, optimal alignment and check your progress in an integrated structure AND find your centre and find your stillness.
MAYBE IT IS EASY It may be the easiest place to find and experience that EASE of posture that you are working so hard for in the hot room. The one where you can check that you are working with your own body’s design, that you are in your best neutral, KNOW WHAT IT IS and carry that with you outside of the Yoga room into your daily life.
THIS POSITION, DONE CORRECTLY, HONOURS YOUR TRUE BODY. It helps you find your blueprint and express this most basic design. Whilst every asana is a search for structural integrity, the alignment principles here will be followed in every standing asana in our sequence. This is at the core of every posture; It is there in spirit even in your final expression of even the broadest poses as it is the starting point and finishing point for all of them. We believe the precision you apply to this reflects the intention you bring to your ENTIRE practice.
IN OUR BIKRAM YOGA CLASS WE NEVER PRACTICE BY ROTE; that can be harmful. The more you practice with us, you will develop your body awareness (kinaesthetic intelligence) and mindful attitude (which is a key element of a good Yoga practice) and you will pay more attention to what is actually happening in your body and what it feels like (rather than what someone external to you is saying what should be happening and what it should look like). The more you practice you will find there are much more important things going on in your newfound Bikram Yoga practice than the actual achieving of postures and when you ‘get’ that you have arrived at the beginning of your Yoga practice.
But different people learn differently; audio, visual, kinaesthetic or a combination and this is why I like using FB as an alternative means of imparting some knowledge.
The following is my personal choice on how to teach that ‘bit in between the standing asanas’ when the newbie might be too tired to think about it or the regular might now want to know more. Please know that I don’t mind how you choose to practice your standing resting position so long as you are not visibly straying from Bikram method. If you are ‘actively’ resting and not leaving it to chance or are doing a variation on picture 2 then I think you will be just fine. Trust me when I say that your class will flow a lot more when you ‘participate’, with intention, in the ‘rest’ in between the asanas and it’ll add a bit more Yoga to your Yoga 🙂 too.
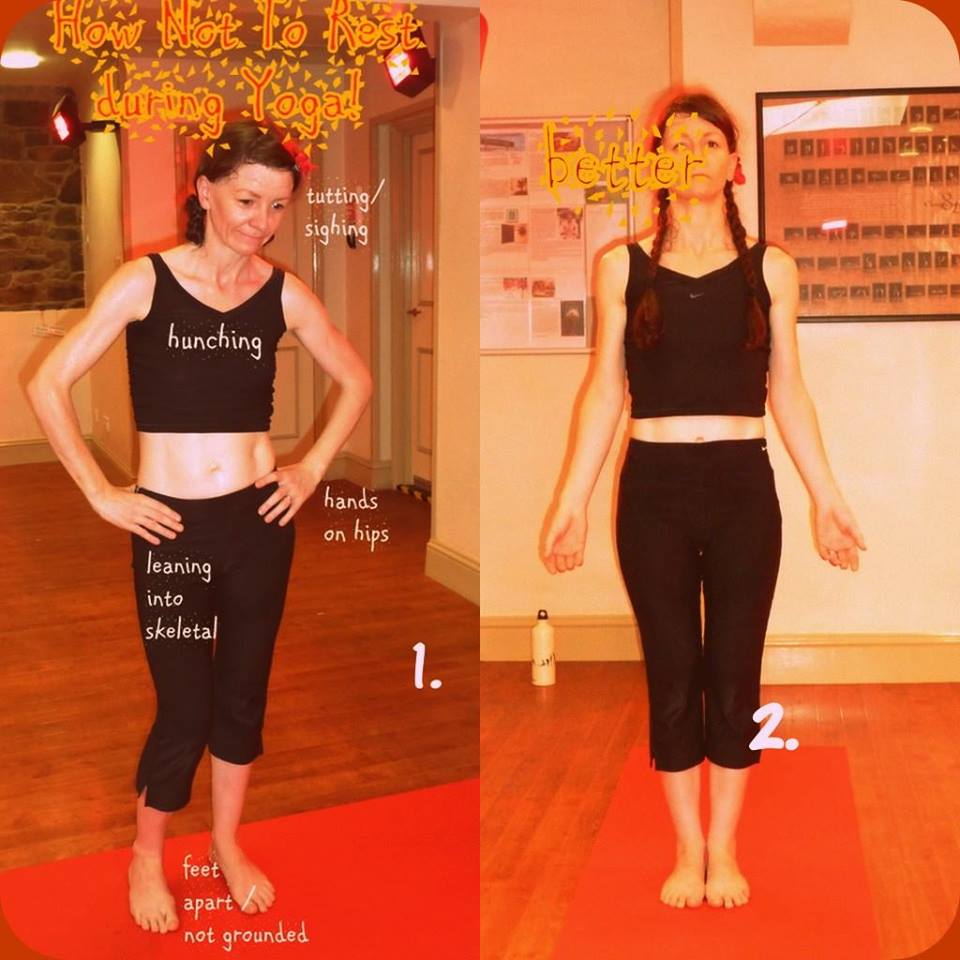
Please look at the pictures, I frequently see variations on Picture 1 in class, particularly with newer people.
“First there is a mountain, then there is no mountain, then there is.” ~ Donovan / Zen Buddhist 🙂
Picture 2 is more like my ideal (it is not perfect, I need to lengthen back of my neck a bit more, but it was the only picture I had available when I wrote this) and I guide people in this particular version. It is a clear VARIATION on classic Yoga pose Tadasana (Mountain) with something added; It might be considered Samasthiti (equal standing). It is not classed as one of the 26/2 postures; it is classed as a ‘given’ in the Bikram room. Generally, this standing resting position might be consider just a ‘passing through’ point in your Bikram Yoga sequence but you don’t want to miss it! please do feel free to come back to this standing resting position if you need extra time out whilst in standing series in YM. Please remember, this is still conscious posturing during your 90 minutes; don’t feel you have to stand like this outside of your Yoga class environment. This posture at this stage is simply a tool to help you achieve maximum efficient rest in between your other movements/still posturing.
Think of the advantages of standing in Picture 2 as opposed to picture 1 or any variation thereof?
TRISHA’S STANDING RESTING POSITION ~ CONSCIOUS POSTURING
~ Bikram foot lock (toes together (knees permitting))
~ Ground yourself to prepare for ‘Equal Standing’
~ Check your distribution of weight; try to be more even according to the structure of your foot
~ Have a little ‘spread of the toes’ and note where your natural distribution lies (you can get some interesting feedback here, perhaps you naturally lean on the ball of the foot on one leg and there is hardly any weight on the other foot ball? Perhaps you lean into the outside of your feet/ankles? Mmm! interesting!)
~ Check you don’t have an excessive anterior tilt of the pelvis (tilting forward)
~ Similarly, does your pelvis tilt posteriorly (back?) (have you lost your natural lordosis?)
~ If you are near a SIDE MIRROR (on right of the room) USE THEM! to check your pelvis/spine profile and adjust yourself accordingly
~ Make sure your shoulders don’t ‘hunch’/’round’ ~ Allow your shoulders to naturally/gently fall wide, back and away from your ears; effectively ‘take up your shoulder space’ it is YOURS! take it up, don’t make yourself small
~ Keep your chest broad, high and open; visualise expansion of the chest
~ Keep the neck long (i.e. don’t lift your chin high (mine is a little high in picture 2) or drop your chin to chest)
~ All things being equal, don’t force, your head should now be stacked free and nicely (floating if you like) on top of your torso (no forward head)
~ Stacking: one standard of correctness says a visual of anatomical neutral from the side shows your ears aprox on top of your shoulders, on top of your hips, knees, feet… (THIS could yet be proved to be the myth of the static ideal, but let us run with it for now). You personally might be up against so many variables/forces that have created a misalignment for you that, depending on that misalignment starting point, some attempts to re-stack and correct it in your effort to re-create this ‘visual neutral’ as a new reference point, can feel awkward and unnatural and actually create more tension in the process. Don’t force. Try to ‘feel’ out your new neutral here as well as see it in the mirror
~ From the front view if you see yourself in the mirror, it may be useful to check if any great difference in the negative space between your arms and your torso?
~ Keep the arms relaxed. As the class progresses you may find your palms ‘naturally’ start to face a little more forward as your chest opens more 🙂
~ Keep the spine neutral (long) – effectively you are seeking your natural curvature of spine
~ Grounded from the waist down, Elevated from the waist up
~ Feet, toes should not grip the mat/towel, nor should they be lifting off the floor
~ ‘PURSUE YOUR LIGHTNESS’ through the top of your head in your Yoga 🙂
~ Have awareness off and observe your breath
I recommend you use the ‘opportunity’ in this little ‘pause’, that is the ‘neutral’ ‘Standing Resting Position’ that occurs between all the standing postures and between many left and right sides of postures, to assess your breath and work your breath by taking in some extra big Yogic breaths if you need them to recover before you start your next action.
I hope this helps. Thank you for reading.
Om Om Om “It is not the Mountain we conquer, but ourselves” ~ Edmund Hillary
Namaste ~ Trisha
February 2015
Post publishing comment: When I first wrote/posted this one 2015 we had a ‘profile’ but FB forced us onto a ‘page’and we lost all comments made to our posts but I remember one man (not a YM practitioner) commented that this post was pointless, he was quite derisive of the content and he expressed his view that you ‘just stand still’ between postures and that is all there is to it. Always grateful that anyone is reading my posts 🙂 I stood by my post at the time and I ‘stand’ by it today – no change. As a practitioner myself it is my view this is a necessary post for many. My posts are about sharing information for the beginner that we don’t always have time to cover in every class. The information in them may bring you to consider ‘how you are’ in your own body’s blueprint and that in turn may lead to more wisdom to your practice that will enable you to flow WITH your body’s natural intelligence and become your own best teacher.